Pages

September 27, 2011

How to make Candy Corn and Halloween Themed Flower Pots


I have quite a few Halloween crafts planned for the next month! As you might know already, Halloween is one of my favorite times of year! 

I had these mini flower pots for quite some time and have been pondering what I should do with them and it donned on me that I should use them to make little Halloween themed flower pots to put yummy treats for loved ones.

Below I outlined exactly how I made them.


I painted three stripes yellow on the top, burnt red in the middle, and a white stripe on the bottom to make the flower pots look like Candy Corns. I filled them with spooky little black spiders for now, but as we approach Halloween, they will  be filled with candy.


After the Candy Corns flower pots, I wanted to make an entire Halloween crew, and I thought the flower pot shape was perfect for a little Frankenstein.


And Halloween isn't the same without running into a little black cat! Just make sure you don't walk by one.


These also make great favors for Halloween Parties or for name tags on the table.

September 25, 2011

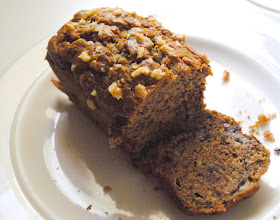
banana nut bread


This weekend I had some bananas and was craving some banana nut bread.


  In order to make banana bread, you will need a few bananas. Especially ones that look like they need to be tossed out. Add melted butter and mash the bananas.


You will need to add some baking soda and a pinch of salt. Add flour, cinnamon, and nutmeg.


One with sprinkled walnuts and one without.


These banana nut breads came out so deliciously good! The whole house smells heavenly. I tried this recipe from Smitten Kitchen. I didn't have the bourbon or ground cloves, but it came out delicious either way.

September 23, 2011

weekly gratitude

  •  Thank you Plan B restaurant and Thomas, our super nice waiter, we had the best burgers and the yummiest Jalapeno Poppers ever!
  • Thank you Target for having such cute Halloween things. I couldn't help but buy the mummy led lights to decorate the house for Halloween.
  • Thank you Richard Pryor and Gene Wilder for making me laugh again as I watched your other movie, See No Evil, Hear No Evil. I can't wait to watch Blazing Saddles and Silver Streak next!
  • Thank you morther nature, for the beautiful weather! I am looking forward to this weekend and celebrating the first day of fall today by buying pumkins and carving them!
  • Thank you Yanni for cooking, cleaning and doing everything this week when I wasn't feeling well. We are so lucky we have each other!
  • Thank you DQ for having the yummiest desserts too and bringing back French Silk Blizzards! My favorite!
  • Thank you Yanni for intervening and making things better when I almost threw a punch, not really, but wanted to, when the cashier person was so rude beyond comprehenstion to us for no reason! You always know when to hold me back :)
  • And a special thank you to all of those who have written to me and said such sweet things to lift my spirits about my grandmother.

September 15, 2011

How To : Make Felt Bats

I have been decorating the whole house with Halloween delight, pumpkins, ghosts,
witches, spiders and webs, and I can't forget my little bat friends!

Let me show you how I created my little felt bat friends.

I purchased 2 pieces of eco-felt (.29 cents each) which are made from
recycled bottles that I purchased at Michaels. You can buy it from any local craftshop.

Step 1. Lay the felt piece flat on a table.
Step 2. Fold it in half

Step 3 - 4. It's cutting time!! You can opt to print a bat template online
to use to cut around but I simply cut away!

I started at the top center of the folded half and cut a little straight across for the
top of its head and then cut out a point for the ear.
Then I cut out small triangles all the way around.
 Open them up and you got some bats.
You can also glue some eyes or paint white dots for eye and add little fangs.
Step 5. Time to hang these bats up! This is going to be fun!
You can tie the bats with string and hang them all around the house,
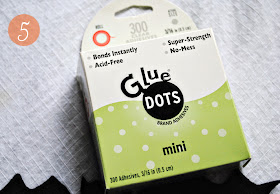
but I wanted to stick them to the wall, so I used glue dots, which you can find at your
local craft store too.
Step 6. Pull a glue dot off
Step 7. Put multiple glue dots on the bat
Put them all over the house! 2 sheets of felt gave me about 10 bats medium sized bats
and I stuck them above the entries and all over for a batastic look!

 
Now it's your turn to try! Show us what you are creating for Halloween. I would love to see it and get inspired.

If you like this tutorial, please let me know, I am thinking about adding some more fun How-To tutorials.

Thanks for stopping by! 

September 11, 2011

Weekend Recap


  • This weekend Yanni and I spent a lot of time outdoors. This weekend was beautiful, sunny, warm, but cool at the same time. We ate breakfast on the porch and while we were eating outside Yanni noticed a beautiful monarch butterfly that I quickly took a few photos of.
  • I ate my favorite Love Crunch and I made Yanni a chicken, onion and pepper omelet
  • Over us I saw a beautiful eagle soaring over us. I hope he was watching over us too.
  • We went for a beautiful hike the next morning and we made it up to the tower. There is such as beautiful view of our Connecticut hills and the park is such an inspiration. We love going there to disconnect.
  • That night we were on our way to our favorite place for dinner and decided to try something new and took a turn and ate an Italian restaurant we never went to before. Unfortunately, it wasn't as great as our favorite place, but we are glad we tried something new. You won't know until you try it!
  • And last, but not least, I have been busy working on sugar skulls, masks, and new head pieces for the shop.
I hope you all have a lovely weekend!! Have a great week!!

new at black feather


I just finished making these new pieces on this beautiful day. I added some new earrings, vintage rings, and bracelets I made. Check them out in the etsy shop: http://theblackfeather.etsy.com