Pages

October 31, 2013

white ghost pumpkins

Halloween is a fun time of year for adults and kids. We need no excuse to get dressed up and eat as much chocolate and candy as we want. Looking for a quick and easy project for Halloween? Make ghost pumpkins. I love carving pumpkins, but this year we opted to paint our pumpkins.
The white pumpkins also work really well for mummies and making vampires.
Simply paint large black circles to make ghosts pumpkins. Really simple, but they look great lined up on the table.

Paint them whatever you want. Once you start painting them it gets highly addicting. The pumpkin skin is so smooth, it's a perfect painting canvas.

Happy Halloween!

October 29, 2013

halloween cookies

Using a square cookie cutter I cut out square gingerbread Halloween cookies. I waited until they were completely cool on the cookie rack before I started decorating. I used a few to create spider webs with white icing. And on the rest of the squares I dipped half of them in chocolate and sprinkled them with Halloween colored sprinkles.


These are perfect for Halloween party treats, to put into clear baggies to give to friends and family, or to just eat with some hot cocoa while watching some Halloween movies. Practical Magic anyone?

Enjoy!

October 28, 2013

halloween spider cookies

Last time I showed you how I made vampire cookies. I also made giant chocolate spiders. I didn't have a spider cookie cutter so I made them by hand with the knife and cut little slabs out for his legs. Next I spread melted a chocolate bar and spread the melted chocolate on him and sprinkled chocolate sprinkles.
They were really easy to make, really fun for kids to help make and yummy with a glass of milk.

Enjoy!

October 27, 2013

on my desk - practical magic

I am starting a new series called "on my desk" and I will be showing you what's currently on my desk whether it's a new book I am reading, a movie I am about to watch, new makeup I am trying or a new treasure I have added to my collection, you catch the drift.

This week on my desk is Practical Magic. It's one of my favorite movies to watch during this time of year. If you haven't seen it, you should. I always watch it right before Halloween. Who doesn't love a tale about witches?

Also on my desk is a framed limited edition signed gocco print from artist Jose Pulido from Etsy shop Mis Nopales of two sugar skull mermaids. I have quite a few of his pieces. I really enjoy his sugar skulls. I am currently eyeing the Aztec Calaveras print. He might just have to be added to my collection.

My Incan statue I found and bought at an estate sale. He holds my pen and other little gadgets.

And lastly two organic and non-artificial chocolate peanut butter cups I am saving to enjoy for Halloween night.

October 26, 2013

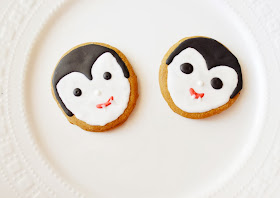
vampire cookies

A few weeks ago I made these cute skeleton gingerbread cookies. Using the same gingerbread recipe that you can find here I made some  more spooky Halloween themed cookies. I don't have a huge arsenal of cookie cutters, but my little collection is growing.

In the meantime I try and double cookie cutters for use of other ideas. So for these I used my square and skull cookies cutters and used a circle jar for the vampires.
I have been doing a bit of research on cookie decorating. It might be something I want to start doing more of. I know now I should be using the proper bags and pipers to make even thin outlines and flood them,
but for a rookie using a single size icing tip I think these came out okay. They still are cute and yummy to eat! I used the Wilton's icing writer in different colors to decorate these cute vampires.

1. I first applied the black icing for the hair and waited for an hour and then I applied the white icing for the vampire face. 

2-3. I waited another hour to work on the smaller details like the eyes, nose and mouth.

4. And then another hour later I added the tiny vampire fangs. Phew..that was a few hours! But it's important to walk away after each one because if you try and do everything at the same time the little vampires icing will bleed (no-pun intended)! Trust me I learned the hard way. Instead of little vampires I had little black, white and red swirls.

Aren't they adorable?  Next, I will also be posting how I made the other cookies like the spider and square cookies.
Have beautiful week and Happy Halloween!

October 19, 2013

how to make gingerbread skeletons

I have been wanting to make these little guys for a long time and finally stocked up all the supplies I would need to make gingerbread skeleton men. Just in time for Halloween.

I haven't made gingerbread men since I was a child, so I was a bit afraid to take this recipe on, but nothing is more relaxing to me than baking...and painting..and Taekwondo, just not all at the same time.

What I enjoy especially about this one is that I get to use the icing like paint to decorate the cookies and bonus - I love skulls. This is was an awesome way to make skulls and skeletons on a different medium then I am used to, instead of paper mache, canvas, or clay.

This is what you need to make these adorable cookies:
Gingerbread men: 3/4 cup unsalted butter, 3/4 cup of brown sugar, 3/4 cup of molasses, 1 teaspoon of salt, 2 teaspoons of cinnamon, 2 teaspoons of ground ginger, 1/4 teaspoon of black pepper (optional) 1/4 teaspoon of allspice, 1 large egg (I substituted with egg whites), 1 teaspoon of baking powder, 1/2 teaspoon of baking soda, and 3 1/2 cups unbleached all-purpose flour. Icing: Wilton's Icing Writer.
Melt butter, mix in brown sugar, molasses, salt and spices.

Beat in egg. Whisk baking powder and baking soda into flour and then stir with molasses mixture, until all mixed together and looks like below.
Divide the dough in half and wrap tightly in plastic wrap and refrigerate for 2 hours or longer.

Preheat oven to 350 degree.

After 2 hours bring dough out. Flour board and rolling pin and roll flat. Thinner dough makes crisper cookies, thicker dough makes softer cookies. I made a combination of both. I like crisper cookies and Yanni loves soft cookies.
Cut out shapes with a cookie cutter.
Place cookies on parchment lined cookie sheets. Bake for 8 minutes. Place baked cookies on cooling rack when they get out of oven.

Once cookies are cooled off, warm the icing in the microwave for 5 seconds on high and make sure to shake the icing. If the icing it too hot the icing will pour out, so you want to make sure the icing is warm enough to easily squeeze out, but cool enough for it to have a good consistency to decorate. I recommend practicing a bit. As you can see I went for it without practicing, but as I went along I started understanding the right squeeze and temperature. Wilton's Icing Writer is perfect for a newbie like me that has never decorated a cookie like this before.

With left over dough I made skulls, ghosts and little dogs too.

Enjoy! Thanks for stopping by and I hope you have a wonderful week!

October 15, 2013

early morning chocolate chip waffles

Early this morning I opened the window curtains and looked outside to see orange and red leaves hanging off the trees. The sky was the brightest of blues.  I opened the windows and let the air flow in and touch my face. The air outside was fresh, crisp and cool. It was a beautiful way to wake up in the morning. I tied on my emerald green robe and slipped on my cozy slippers and shimmied over into the kitchen and I gathered a few items in my arms and piled them on the counter.

1/3 cups of flour, 4 teaspoons of baking powder, 1/2 teaspoon of salt, 1 teaspoon of sugar, 2 egg whites, 1/3 cup of melted unsalted butter, and 1 3/4 cups of milk.

I combined all the ingredients.

And sprinkled a hand (or maybe two or three..who's counting...) of chocolate chips. Blueberries,
bananas, and strawberries always are yummy too.

I warmed up my waffle maker and lightly brushed it with left over melted butter. I poured the batter into the center of the waffle maker and spread it lightly until it was even.

My waffle maker takes about 5 minutes and the largest, most crisp, and moist waffles comes out to feed a small army. 

I highly recommend you make these waffles on an early weekday morning. It doesn't take much time at all. Don't wait until the weekend to enjoy a yummy breakfast.

Have a beautiful week!

October 13, 2013

halloween chocolate covered oreos


I have been working on some more sweet treats for Halloween. I made these using orange vanilla flavored chocolate and decorated them with Halloween sprinkles. Don't mind the half eaten oreo. I am not only the maker, but I am also the tester :) It's a one woman show.

I also put these in the Milk & Chocolate shop on Etsy: https://www.etsy.com/shop/TheMilkandChocolate 

I think these make a really great treat to give to friends and family for Halloween. Are you making any Halloween themed treats? 

October 6, 2013

halloween chocolate covered oreo mummies


Fall is here and Halloween around the corner. I've been thinking about new ideas for some new sweet treats for Halloween. Using white chocolate I made some white chocolate dipped oreos with candy eyes. They are the cutest mummies. They are available in my Milk & Chocolate shop: https://www.etsy.com/shop/TheMilkandChocolate in a bag of three of a box of six.

I am also working on some other little Halloween characters. I will be showing a DIY tutorial in the next few days on a yummy Halloween sweet treat. Stay tuned.

October 4, 2013

day of the dead paper mache masks


 It's that time of year! Fall is here and this weekend I am working on making Dia de los Muertos masks, skull heads, and ornaments. The studio is filled with painted masks, paint, brushes. I love this time of year. I create a lot of different things like my jewelry, I bake, I do Taekwondo, I am currently taking classes to finish my Masters, but this time of year I make sure to slow down and make alone time for me. That's what painting does for me. I get to sit in my studio for hours and paint. It's like mediation. For those few hours you forget about all the little things you have to do like errands, clean the house, make food, you just live in the moment with your paint brushes getting lost.

Stop by the Peachy Cheek shop: http://peachycheek.etsy.com as I will be updating with new pieces of Day of the Dead art.

October 3, 2013

starting taekwondo as an adult

As some of you may know I am currently practicing Taekwondo, a Korean martial art. I got my first belt, the white belt, in November 2012. Here is a recent picture of me with my Master. He's a 5th degree black belt from Korea, and he trains us very hard physically, but has a great personality and makes sure that we train hard, but also focuses on the importance of a positive spirit and mind.

Every two months we are tested after training in self-defense, kicking, form and breaking techniques. This past week I tested for my 6th belt in the curriculum, the blue belt.  The next belt is the brown belt, and that is about the half-way point of my training. I am half-way to achieving my Black belt in Taekwondo.

It's an unbelievable feeling to be working on a goal I have wanted for so long. I wanted to train and practice a martial art ever since I was a child. As an adult I didn't know if it was something I would be able to do. For a long time I thought I missed my opportunity. I was worried I wouldn't be as flexible, as quick, and have the endurance to keep up.

When I realized that quite a few adults joined that have had no previous experience, I felt motivated. I felt I could try it. And I am so happy I decided to start training. Since I started training I have seen a huge increase in strength and my flexibility. The age and sizes of people vary in my adult class and everyone keeps up and does the best they can do. The oldest student is 74 years old and has more endurance and strength then any young person I know. He's sweet, has a big heart, and trains hard.  Size doesn't matter either, some people join to get healthier or to lose weight. We push each other to be the best we can be. Everyone has their own limits and comfort zone and we respect that.

What I learned is that it is never too late to go after a dream and a goal you set. Don't let yourself make excuses to do something you want to do. I wasn't as flexible before, but I have become more flexible. I didn't have the endurance before, but I do now. I didn't have any muscles before, I do now. Sure, I still wish I started when I was younger, shoot, by now I could have been a potential 3rd degree black belt or beyond. But there is a time for everything.

I know I am where I am supposed to be. I think entering it as an adult has made me appreciate and value it even more. I have been given opportunities to help instruct children and while some are very talented and are committed, some are practicing because their parents have encouraged them and while some return, others do not. It's easy for young children to stop enjoying something they previously enjoyed, they have school, homework, friends, other activities and events comes up.

As an adult, I decided what I wanted to commit to. I made the commitment to the art and to myself. A commitment I might have not valued as a child.

In addition to this feat, I am entering my first competition next month! I am excited and very nervous. I will keep training and I will set a new goal!

Thanks for stopping by.