Pages

May 26, 2014

retro diner birthday party


We threw a small 50's retro diner themed party for Yanni's birthday with the help of my sister of A Delicate Gift. Last year we threw a fiesta for him. My sister plans parties, makes invites, and makes matching decorations for parties that she sells on Etsy. I knew she was the perfect person to help me throw this party.

Yanni and I both love retro classic diners, he loves burgers and I love milkshakes, so it was the perfect theme for this birthday party. We had a few friends come over to celebrate. I set up a burger and hotdog bar and an ice cream and milkshake bar for dessert.  Here are a few photos of the food table and some of the decor. I had lots of fun with this one. I will be sharing the ice cream bar and dessert table very soon.


We served hamburgers and hotdogs and everyone dressed them up using relish, pickles, mustard, ketchup, onions, lettuce, american cheese, and tomatoes. For sides we had salad and a friend brought over the most delicious potato salad. We also made some fries. You can't eat at a diner without having some fries with your burger.

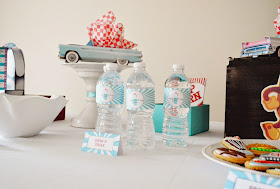
For drinks we had some bottles of water wrapped in custom water bottle wrappers and some glass coca-cola bottles from Mexico.

For some snacks we had some popcorn in vintage style bags, and diner themed cookies that were made for the party. Those were a big hit.

For decor we added a few retro diner themed items in the party's theme color. We placed a jukebox in the middle of the table on a vintage style wooden box we accidentally and luckily found on sale at Big Lots. We hung balloons on top of the table in the the party's theme colors, which were skyblue, red, yellow, and white. We added some small details like the plastic red plates with red and white checker wax paper for everyone to serve their food in, NY Greek diner paper cups with red and white straws.

I can't wait to share with you the ice cream bar and dessert table. We had lots of fun and it will definitely be a day we will remember.

Items and Supplies

Jukebox Centerpiece: Amol's Party | Waterbottle Wrappers: A Delicate Gift  |  Food table topper cards: A Delicate Gift | Red Food Baskets: New Star Food Service  |  Red and White Checker Wax Paper: Cake Supply Shop | Vintage Style Coca-Cola Crate and Napkin Holder: Big Lots | Similar Wooden Vintage Coca-Cola Crates: Etsy  | Vintage Style Great Hamburger Sign: New Retro Signs | Red and White Straws: Kikkerland | Ketchup and Yellow Squeeze Bottles: Tablecraft | Cookies: A Dozen Eggs Bake Shoppe | Greek Diner NY Paper Cups: Solo Cup Company

May 19, 2014

flourless pancakes with oats and banana


This weekend I was craving some pancakes, only to realize I ran out of flour. I had some oats, bananas and knew I could make something. So off I went to find a recipe online that matched the ingredients I had in the cabinet and one that sounded delicious. Thats where Mountain Mama Cooks came in and she hit the nail on the head with these.

Ingredients
Adapted from Mountain Mama Cooks

2 cups of instant oats
1 1/4 cup of milk
1 large ripe, organic banana
1/2 teaspoon ground cinnamon
1 tablespoon of honey
1 teaspoon pure vanilla extract
1 1/2 teaspoons baking powder
1 large cage-free/organic egg
Sunflower Oil for pan


Add 2 cups of instant oatmeal in a blender. 


Next, add one banana and a tablespoon of honey.


Next, add the cinnamon, the baking powder, vanilla extract, and lastly the milk.  Blend until smooth.


Add the egg and blend a little longer until all is combined.


Heat your pan and I add a little but of sunflower oil and brus it over the entire griddle. 


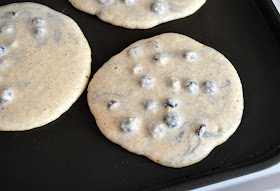
Pour the batter. Flip the pancakes over once you see a good amount of bubbles have formed (about 2-3 minutes).
I made some chocolate chip and blueberry ones.


This recipe made about 9-10 pancakes. These were delicious and moist. I might make these more often. Who needs flour when you got oats, milk and bananas.


May 16, 2014

french fry and ketchup pinata


I made this cute french fry pinata using a small box and used red and yellow streamer paper. I added a few "fries" on the top by covering a few strips of cardboard with yellow streamer paper. 

I had to give Fry Guy a friend, so I made Mr. Ketchup to keep him company. 


Step 1: You will need red streamer paper, box, glue, tape, scissors, and white, red, and black paper. Tape the box closed.
Step 2: Cut long strips of streamer papers. I usally will wrap one around the box to see how long I need it and will cut a bunch in advance. Next, cut fringe on the streamer paper.
Step 3: Add a strip of glue on the box.
Step 4: Lay fringe paper on the box and wrap around the box.
Step 5: Cover the entire box.
Step 6: I saved the label on my computer and inserted into Word to make it smaller. Next, I printed the lable on white paper and glued it on the box. Download label. Next, add the eyes, nose and mouth. I cut them out of construction paper.

May 14, 2014

may 2014 birchbox review and the importance of sunscreen


My May birchbox arrived. I love getting little packages in the mail. This one was all about fun in the sun, but also the importance of being safe in the sun. I am going to share with you a little bit of the box, but also want to share with you the importance of sunscreen.


First, my favorite item in the box was the Pixi shea butter lip balm in coral crush. It's very smooth and I love the pop of color on my warm skin tone and you can also use it as a cheek tint. 

And I really liked the Gilchrist & Soames body lotion. It is rich in marine extracts and really left my skin soft. It would be perfect to apply to feet after a at home pedicure.


I thought this was important to share and hope it alerts people on to the seriouness of protecting oneself against UVA and UVB.  Did you know that 90% of sign of aging are caused by sun damage.

If that doesn't scare you, one in five Americans will be diagnosed with skin cancer in their lifetime. I recently had a little scare. I am very aware of any new spots or freckles on my body and I go to a Dermatologist every year for a entire body scan. I noticed that I had a freckle on my arm that had grown in the past year, from a small dot to a large circle (a little smaller than the eraser on a pencil).

So I made an appointment with my dermatologist and showed it to her. She indicated that freckles that have grown, change shape, size or color should be looked at. So I opted for her to remove the freckle from my arm and send it in the lab. I was lucky that it was fine. I know have a small cut out circle in my arm. I would much rather have this than risk it being anything else.

First thing in the morning after I wash my fave I apply sunscreen (sun or no sun) to my face, neck, hands, arms, and ears. I have been doing this everyday since I was 17. I wish I started sooner. But I will admit that I neglect my feet and legs from time to time. I bought a sunscreen spray to spray it on, so I should not have any excuse for the summer.

Young women are more likely than young men to get skin cancer. That doesn't just mean young women should be protecting themselves. We all should be. I have heard some women not liking sunscreen because they don't like the way it feels or looks on their screen. I have been using Olay All Day Moisturizer with Sunscreen SPF 30 for years and it's my absolute favorite. I also use the version for sensitive skin.

And it's not just women. I am worried about men. I did quite a bit of research and I learned that men over 50 are more than twice as likely as women to develop and die from skin cancer.

They have much more sun exposure and they aren't likely to go a dermatologist like women are. They need to take care of their scalp, ears and noses. Please urge the men in your life to wear sunscreen, if they choose not have them wear a hat, sunglasses, and a shirt when outside.


Follow the ABCD rule:

Asymmetry The two halves of your mole do not look the same.
Border The edges of your mole are irregular, blurred or jagged.
Colour The colour of your mole is uneven, with more than one shade.
Diameter Your mole is wider than 6mm in diameter (the size of a pencil eraser).

May 12, 2014

agave pecans


Ingredients

1/4 cup dark agave nectar
2 teaspoons freshly cracked black pepper
1 teaspoon kosher salt
1/4 teaspoon ground allspice
1 tablespoons sugar
2 cups pecans

Preheat the oven to 350 degrees F.


In a medium bowl, stir together the agave, pepper, salt, allspice and sugar. Add the pecans, tossing to coat well.


Spread the pecans in a baking pan and bake in the middle of the oven 15 to 18 minutes stirring every few minutes. When cool enough to handle, break apart the pecans.


May 7, 2014

retro soda pop pinata


I love making pinatas; it's something about working with my hands, working with all the bright colors, and making something come to life with such simple and accessible objects like cardboard, paper, and even a foiled chip bag.

Warmer days mean BBQ season will soon be in full effect. And I love me some burgers. I thought it would be super fun to make some BBQ and retro diner themed pinatas and these are a fun and perfect addition to any summer party. I will doing a series of pinatas for summer. 

I couldn't bare to break these little guys, so these are going to be summer staples at all BBQ and summer parties.

Today I am going to show you how to make the retro soda pop pinata.


Materials: Box, glue, scissors, tape, blue streamer paper, foil or a foil bag of chips, white, black and red construction paper, and a straw.

Step 1: Find a box in the desired shape and size and tape it closed.
Step 2: Cut strips of streamer in the length of around the box and fold the streamer paper a few times.
Step 3 and 4: Cut small vertical slits to make the fringe.
Step 5: Add a strip of glue to the box.
Step 6:  Glue the fringe to the box.
Step 7: Continue to cover the entire box with the fringe. Next, prepare your materials to decorate the little soda pop. I used construction paper for his eyes, nose, mouth, and the soda tab, and to cut letters out.
Step 8 and 9: Place the letters and add the little face. Cut foil to place on top to give the appearance of the silver soda can top.
Step 10: Make a small hole on top of the box and poke the straw through.


Here is the family of BBQ and retro themed pinatas we have made so far. I love these little guys. I can't help but laugh and smile when I look at these.